How to Replace a Sliding Door Rail?
A complete step-by-step guide — from identifying the right replacement rail to the final height adjustment — with the specific details that matter for South Florida doors.
- Rail vs. Track — Understanding the Terms
- Before You Start — What to Confirm First
- How to Source the Right Replacement Rail
- Tools You Need
- Step-by-Step Rail Replacement
- Post-Installation Height Adjustment
- Common Mistakes and How to Avoid Them
- Can You Replace Just a Section?
- Rail Replacement in Naples and Collier County
- Frequently Asked Questions
Replacing a sliding door rail is the most hands-on repair in the track cluster — and the one that most homeowners either approach with too much confidence or too much hesitation. Done correctly with the right parts and a capable helper, it's a one to two hour project that completely restores the door's operating surface. Done with the wrong rail profile or without proper threshold preparation, it creates new problems on top of the old ones.
This guide covers the complete process from start to finish — how to identify the right replacement rail, the tools you actually need, each step of the replacement procedure, the height adjustment that most DIYers skip or do incorrectly, and the specific details that matter for homes in Naples, Collier County, and throughout Southwest Florida where coastal conditions and impact glass doors add complexity that a basic how-to guide typically misses. A1 Sliding Doors replaces rails across the full South Florida region daily — here's exactly how it's done.
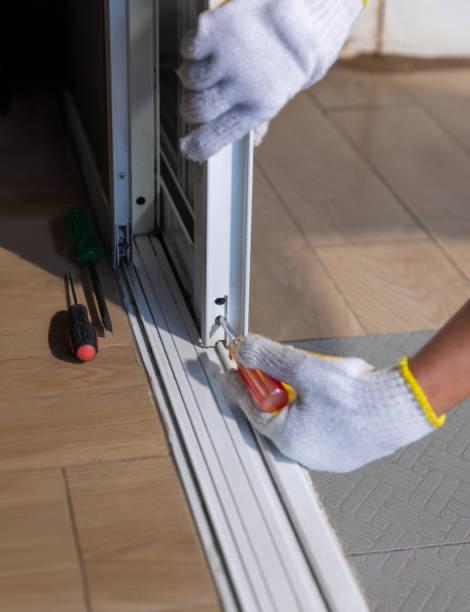
New rail positioned for installation — correct profile, correct length, threshold cleaned and ready.
Rail vs. Track — Understanding the Terms
Before getting into the replacement process, it's worth clarifying terminology because "rail" and "track" are used interchangeably by most homeowners and even some contractors, which causes confusion when sourcing parts.
In technical terms, the track refers to the complete extrusion assembly set into or onto the threshold — the full aluminum profile that spans the width of the door opening. The rail refers specifically to the raised center section of that extrusion — the ridge that the roller wheels ride on. You cannot replace just the rail without replacing the full track extrusion it's part of, because the rail and the surrounding channel walls are machined from a single piece of aluminum.
When homeowners say "I need to replace my door rail," they almost always mean the full track extrusion. When parts suppliers and technicians talk about "the rail profile," they're describing the cross-sectional shape of the track — which is what you need to match when ordering a replacement. Throughout this guide, "rail replacement" and "track replacement" are used interchangeably to mean the same thing: removing and replacing the full track extrusion.
Before You Start — What to Confirm First
Rail replacement is the right repair when the track itself is the problem — not when cleaning, lubrication, or roller replacement would resolve the issue. Before committing to this repair, confirm the track genuinely needs replacing rather than a simpler intervention.
- Clean the track thoroughly first. A door that's stiff due to debris accumulation doesn't need a new track — it needs a proper clean and silicone lubrication. Rail replacement on a door that just needed cleaning is unnecessary work and expense.
- Check the rollers. A door that's rough because of worn rollers may improve significantly with roller replacement alone, without touching the track. If the track surface is still in reasonable condition, roller replacement is the correct starting point.
- Confirm the track damage requires replacement. Deep grooves, significant corrosion pitting, cracked sections, or bends that can't be straightened all require replacement. Minor dents and surface oxidation often don't. Our post on sliding door track problems and solutions covers the repair-vs-replace decision in detail if you need to confirm which situation applies.
- Decide whether to replace rollers at the same time. If the rollers show any wear, replacing them simultaneously with the rail is almost always the more efficient and economical choice. The door panel is already off — doing both in one visit costs far less than two separate visits.
Before removing anything, photograph the existing track from multiple angles — the full length view, a close-up of the profile from the end, and any fastener positions you can see. These photos are invaluable when sourcing the replacement rail and confirming the correct installation orientation when the new rail goes in.
How to Source the Right Replacement Rail
Getting the correct replacement rail is the most critical step in the entire process. Installing an incorrect rail profile creates a situation where the door either doesn't sit at the right height, the roller doesn't seat correctly in the channel, or the fastener pattern doesn't match the threshold — all of which require starting over.
Method 1 — Manufacturer Identification
Find the door manufacturer's stamp on the frame (bottom rail of the door panel, header, or stile edge). PGT, CGI, Milgard, Andersen, and Simonton all use specific track profiles for their door systems. With a confirmed manufacturer and model, a sliding door parts supplier can cross-reference the correct track extrusion directly.
Method 2 — Measure the Existing Track
If the manufacturer isn't identifiable, measure the old track extrusion directly. Key measurements include the overall width of the track base, the height of the center rail above the channel floor, the depth and width of the roller channel, and the total track length. The most important of these is the rail height — even a 1mm difference puts the door at the wrong operating height relative to the top header track.
Method 3 — Bring the Old Track to a Supplier
If you can remove the old track in one piece, bringing it to a sliding door parts specialist is the most reliable matching method. A technician can visually compare the profile and confirm the replacement before you leave the counter. This is the recommended approach for any track from a door that's more than 15 years old, where the original brand specifications may be harder to track down.
What Not to Do
Don't order a replacement rail online based solely on matching the overall track length and a rough description of the profile. Aluminum track extrusions come in dozens of profiles with similar overall dimensions but different rail heights, channel widths, and wall thicknesses. The visual similarity between incompatible profiles is significant enough that online ordering without confirmed measurements or manufacturer verification produces incorrect parts at a higher rate than in-person matching.
Tools You Need
Rail replacement requires slightly more tooling than roller replacement but nothing that requires specialized equipment.
Never attempt rail replacement alone. The door panel must be removed, and panels weigh 80 to 200 pounds depending on glass type. A dropped panel can shatter the glass, damage the frame, and cause serious injury. Have a capable second person present before starting the job.
Step-by-Step Rail Replacement
If there's a screen door on the exterior track, remove it first by lifting it up and tilting the bottom outward. Set it safely out of the work area. This clears access to the main door panel and the track.
Locate the adjustment holes along the bottom rail of the door panel — usually covered by small plastic caps. Remove the caps and insert a Phillips screwdriver. Turn counterclockwise to retract the roller wheels up into the door body. Retract both sides evenly until the door panel drops close to the track surface.
With your helper positioned on the other side, tilt the bottom of the door panel toward you while lifting upward. The top edge of the panel exits the header track first, then the bottom lifts free. Carry the panel horizontally to the padded surface you've prepared and lay it flat. Never lean it unsecured against a wall.
With the panel out, look along the track length for screws securing it to the threshold. They're typically spaced every 12 to 18 inches. Remove all of them and set them aside. Note whether any screws are in different positions or are different sizes — these details matter when installing the new track.
With fasteners removed, the track should lift free of the threshold. In some installations, particularly older ones, the track may be set in a bed of sealant that requires careful work with a utility knife or putty knife to free it without damaging the threshold. Work along the full length rather than pulling from one end — prying from one point can bend the old track and make it harder to remove cleanly.
Clean the threshold surface where the old track sat. Remove any old sealant residue, debris, and surface contamination. If the threshold shows water damage, rot, or significant corrosion, address it now before the new track goes in — a deteriorated threshold won't hold the new track fasteners securely. For concrete thresholds in South Florida homes, check whether the existing fastener holes are still solid or need to be re-drilled with anchors.
Measure the opening width precisely — measure twice — and mark the cut line on the new track extrusion. Use a fine-tooth hacksaw or aluminum-rated circular saw blade to make a clean, square cut. A rough or angled cut creates a gap at one end that allows water intrusion and leaves the end of the rail unsupported. After cutting, use a metal file to remove all burrs from the cut end — any remaining burr will snag the roller wheel or weatherstripping during the door's travel.
Run a bead of exterior-grade sealant along the threshold surface where the track base will sit. The sealant creates a waterproof seal at the junction between the track and the threshold — particularly important in South Florida where heavy rainstorms regularly push water against door thresholds. Position the new track in the opening, ensuring it's centered and flush with the door frame on both ends.
Drive screws through the track's pre-drilled holes into the threshold at the appropriate intervals. Use the correct fastener type for your threshold material — wood screws for wood thresholds, concrete anchors for concrete. Don't overtighten — aluminum track extrusions can crack under excessive fastener torque. Firm and snug is the target, not maximum torque.
Vacuum the new track channel to remove any metal filings from the cutting and installation process. Apply a light coat of silicone spray lubricant to the rail surface. With your helper, lift the door panel and insert the top edge into the header track first, then swing the bottom in and lower it onto the new rail. Tap gently with the rubber mallet if needed to seat the panel fully.
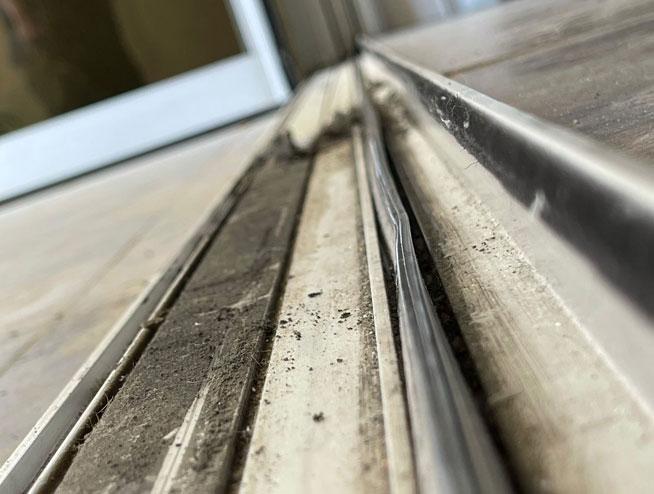
Old rail removed — threshold cleaned and prepared before new rail installation.

New rail secured and sealed — ready for door reinstallation and height adjustment.
Post-Installation Height Adjustment
This step is where many DIY rail replacements fail to achieve the results a professional produces. The new rail is installed, the door is back in the opening, and it moves — but the lock won't engage, there's a gap at the top of the frame, or the door scrapes the threshold. All of these issues are resolved through correct height adjustment, and the adjustment process requires patience and testing rather than a single set-and-done operation.
Turn the roller adjustment screws clockwise in small, equal increments on both sides to raise the door off the rail floor. Make quarter-turn adjustments and test the door after each one. The door should clear the rail cleanly and slide freely with light resistance.
Slide the door fully open and fully closed, watching the top edge in the header track. The door should move freely without contacting the header at any point. If the door binds at the top, it's been raised too high — lower it slightly on the binding side.
Close the door and examine the gap between the door panel and the frame. It should be even from top to bottom. An uneven gap — wider at the top on one side — means the door is tilted and one side needs to be raised or lowered relative to the other.
Close the door and test the latch. It should engage the strike plate cleanly without lifting the door or applying force beyond what the handle mechanism provides. If the latch is above or below the strike plate, adjust door height accordingly until the lock operates naturally.
Slide the door back and forth ten times at normal operating speed. It should be smooth throughout, with no binding, jumping, or grinding. Once satisfied, replace the plastic caps over the adjustment holes to protect them from debris. Reinstall the screen door if one is present.
Rather Have It Done Right the First Time?
Same-day rail replacement across Naples, Marco Island, Bonita Springs, Fort Lauderdale, Pompano Beach, and all of South Florida. Free estimates, flat-rate pricing, warranty on every job.
Common Mistakes and How to Avoid Them
The most common and most costly error. Visually similar profiles with different rail heights produce a door that sits at the wrong level, won't lock properly, and may not even be stable on the new rail. Always confirm measurements or manufacturer specs before purchasing. When in doubt, bring the old track to a supplier for direct comparison.
Installing a new rail directly over old sealant residue or into a damaged threshold produces a rail that doesn't sit flat, allows water infiltration, and loosens within months as the compromised substrate fails to hold the fasteners. Always clean and inspect the threshold surface before the new rail goes in.
An angled cut leaves one end of the rail unsupported and creates a gap at the frame where water enters and debris accumulates. Take time to mark the cut line carefully with a square and make the cut slowly. A metal file cleans up minor imperfections, but a significantly angled cut requires another attempt on a new section of extrusion.
Metal filings from the rail cutting process contaminate the new track channel and act as abrasives against the roller wheels from the first cycle if the channel isn't cleaned and lubricated before reinstallation. Always vacuum the channel and apply silicone spray before the door goes back in.
A common shortcut that produces a door that appears to work but locks poorly, leaves gaps in the frame, and wears the new rail unevenly because the roller is contacting the rail at the wrong pressure angle. Take the time to adjust and test fully before considering the job complete.
Can You Replace Just a Section?
This question comes up often when the damage is clearly localized — a single dent or a short section of corrosion near one end of the track. The appeal of replacing just the damaged section rather than the full length is understandable, but it's not a workable solution in practice.
Aluminum track extrusions are single-piece components that span the full width of the door opening. There is no industry-standard joining mechanism for splicing two sections of residential track together. Any splice attempt creates a joint — a raised point or a gap — at the junction. The roller wheel hits this joint on every open-and-close cycle, producing the same jolting symptom as a bent track dent. Within weeks, the joint also becomes a point of accelerated wear on both the track and the roller wheel.
Full-length replacement is the correct approach even when only a small section is damaged. The additional cost of a longer piece of extrusion compared to a short section is minimal — track extrusion is inexpensive material. The labor is the same either way. And a full-length new rail gives you a clean, consistent operating surface from end to end rather than a patched one that requires revisiting within the year.
Rail Replacement in Naples and Collier County
Naples and the broader Collier County market present specific considerations for rail replacement that aren't as prominent in more northern Florida markets. The combination of Gulf Coast salt air, fine limestone-derived coastal sand, and a high proportion of impact glass doors installed since the 2004 and 2005 hurricane seasons creates a specific set of challenges for both identifying the correct replacement rail and executing the installation safely.
The dominant door brands in post-2005 Naples construction — primarily PGT and CGI impact systems — use track profiles that differ from their standard residential counterparts. A PGT WinGuard track has different dimensions from a PGT standard track even when the doors are visually similar. Getting this distinction wrong in sourcing is the most common rail identification error in this market. An experienced technician who services Naples sliding door repairs regularly will have this knowledge built in and typically carries the most common Collier County profiles on the vehicle.
For the significant number of older aluminum-frame doors in Naples communities built in the 1980s and 1990s — in areas like Port Royal, Aqualane Shores, and older sections of Park Shore — the original track profiles may no longer be in standard production. These situations benefit most from professional assessment, where an experienced technician can identify a compatible cross-reference rather than a direct replacement. If you're ready to get your Naples door operating correctly with a new rail, contact us for a free estimate and we'll confirm the correct part and timeline before any work begins.
Ready to Replace That Rail?
Serving Naples, Marco Island, Bonita Springs, Fort Lauderdale, Pompano Beach, and all of South Florida. Same-day service, free estimates, warranty on every job.
Frequently Asked Questions
The terms are often used interchangeably. The track refers to the full extrusion assembly in the threshold; the rail refers specifically to the raised center section the roller wheels ride on. In practice, replacing the rail means replacing the full track extrusion — you cannot replace just the rail profile without replacing the entire piece it is machined from.
Identify the door manufacturer from the frame stamp, or measure the existing track's channel width, rail height, and overall length and compare against the replacement. The most reliable approach is bringing the old track to a sliding door parts specialist for direct comparison. For branded doors like PGT or CGI, confirming the manufacturer and model narrows the option significantly.
Not effectively. Splicing in a section creates a joint that the roller wheel bumps over on every cycle, replicating the symptom of a bent track dent. Full-length replacement is the correct approach even when damage is localized — the additional material cost is minimal and the labor is identical.
Apply a bead of exterior sealant to the threshold surface, position the new rail, then drive screws at 12 to 18 inch intervals into the threshold. Use wood screws for wood thresholds and concrete anchors for concrete thresholds. Don't overtighten — firm and snug, not maximum torque. The sealant step is critical in South Florida's rainy climate.
After reinstalling the door, adjust the roller height screws until the door clears the rail cleanly, closes flush with the frame on all sides, seals properly at the top and bottom, and allows the latch to engage the strike plate without lifting or forcing. The door should slide with minimal resistance — one finger of force should be enough to move it fully.
A professional technician typically completes a bottom rail replacement in 1 to 2 hours including panel removal, old rail extraction, new rail cutting and installation, door reinstallation, and height adjustment. A first-time DIY attempt may take 3 to 4 hours. Combined rail and roller replacement adds 30 to 60 minutes.


