Can You Replace Door Locks Yourself?
An honest skill-level assessment for every sliding door lock job — what you can realistically handle yourself, where the risks are, and when calling a professional saves more time and money than the DIY attempt.
- The Honest Answer — It Depends on the Job
- Job 1 — Primary Latch and Handle Swap
- Job 2 — Charlie Bar Installation
- Job 3 — Foot Bolt Installation
- Job 4 — Pin Lock Installation
- Job 5 — Keyed Deadbolt With New Frame Holes
- Job 6 — Impact Door Lock Work
- Tools You Actually Need
- The Real Risks of a DIY Lock Replacement
- What to Do When the DIY Attempt Doesn't Work
- DIY Lock Work in Naples — Specific Considerations
- Frequently Asked Questions
The honest answer to whether you can replace a sliding door lock yourself is: yes for most jobs, with one important caveat — the hardest part isn't the installation, it's sourcing the correct replacement part. A homeowner who has the right assembly in hand can swap a primary latch in 20 minutes with a screwdriver. The same homeowner who purchases the wrong replacement wastes a trip to the hardware store and sometimes damages the frame trying to make an incompatible assembly fit.
This guide gives you a clear skill-level assessment for each lock job type — what's actually involved, what can go wrong, and the specific situations where a professional saves more time and frustration than the DIY attempt costs. For Naples homeowners with impact-rated doors, there are specific considerations that apply here and nowhere else, covered in detail below. For professional sliding door lock installation when you'd rather skip the DIY entirely, same-day service is available.

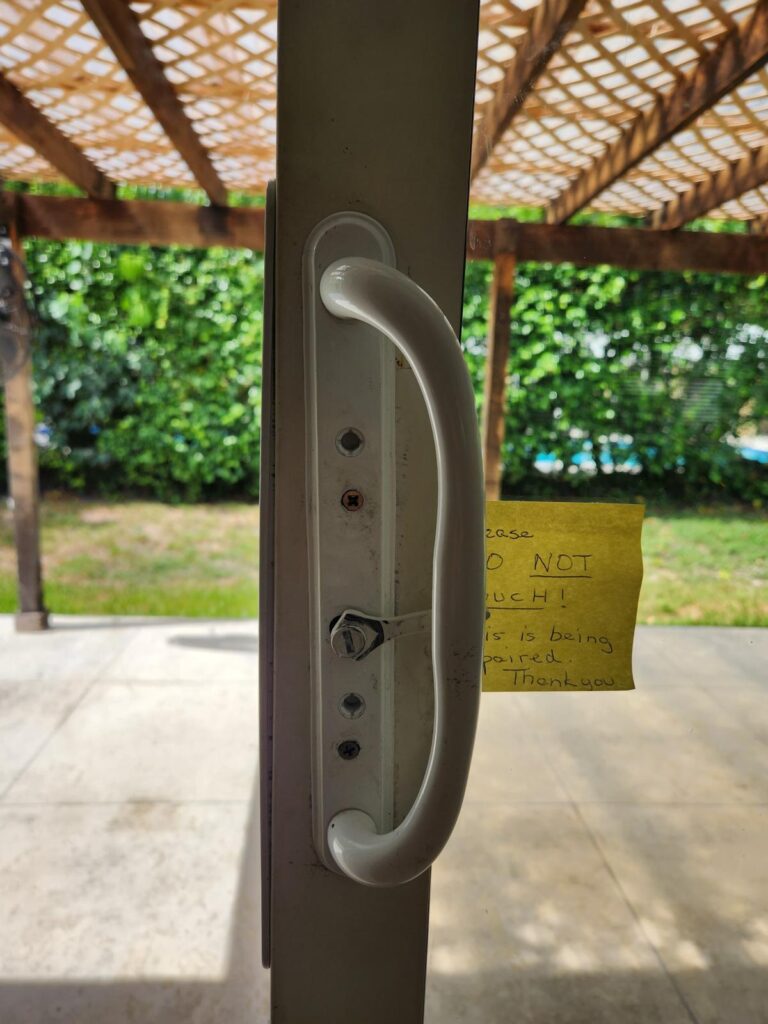
The primary latch and handle assembly — the most common DIY lock job, and one of the most manageable with the right part in hand.
The Honest Answer — It Depends on the Job
Sliding door lock work spans a wide range of difficulty — from pinning a track rod (under 5 minutes, zero tools) to installing a keyed deadbolt in a new frame hole on an impact-rated door (professional territory in most cases). The six job types below cover the full range with an honest assessment of each.
One principle applies to all of them: never force anything on a sliding door frame. Aluminum and vinyl frames are not forgiving of impact damage, stripped threads, or bent cutout edges. If a replacement assembly isn't sliding in cleanly, stop and confirm you have the correct part before applying more force. The cost of a professional visit is almost always lower than the cost of a damaged frame.
Job 1 — Primary Latch and Handle Swap
This is the most common lock job on South Florida sliding doors and the most accessible for a homeowner with basic tool comfort. The existing assembly comes out when the interior handle screws are removed, and the replacement slides into the same cutout and secures with the same holes.
The only technical requirement is having the correct replacement. Screw hole center-to-center spacing and the latch bolt geometry must match the existing cutout. If they do, the installation is mechanical — no drilling, no measuring, no adjustment to the door. The latch either engages the strike plate correctly or it doesn't, and if it doesn't, the most likely cause is either the wrong replacement part or the door having dropped and needing roller height adjustment.
Job 2 — Charlie Bar Installation
A Charlie bar bracket mounts to the interior of the door frame with two to four screws. Mark the bracket position (center height on the frame, with the bar resting in the track channel when lowered), drill pilot holes, and drive the screws. The bar pivots up out of the way on a hinge and drops into the security position.
The key detail is anchor type — aluminum frame screws need to be the right size to bite into the frame wall without going through it. Most Charlie bar kits include appropriate fasteners. Test the fit by dropping the bar and verifying it sits flat against the door panel without significant gap. A gap of more than a quarter inch reduces effectiveness.

Assembly removed — the cutout dimensions and screw spacing are the measurements that determine whether the replacement fits.
Replacement in place — latch engagement confirmed before closing up the frame.
Job 3 — Foot Bolt Installation
A foot bolt adds one step beyond the Charlie bar — drilling a receiver hole in the threshold in addition to mounting the bolt mechanism on the frame. The mechanism mounts to the bottom of the door frame (similar to the Charlie bar bracket), but the bolt drops vertically into a receiver in the threshold below rather than bracing horizontally.
The threshold receiver hole requires the correct bit size (matched to the bolt diameter) and needs to be drilled cleanly vertical — an angled hole causes the bolt to bind. For concrete thresholds, a hammer drill and masonry bit are required. For aluminum thresholds, a standard HSS bit works. Test the bolt drop into the receiver before finalizing the bracket position — small adjustments to the bracket mounting location may be needed to achieve clean bolt engagement.
Job 4 — Pin Lock Installation
Close the door and mark a point on the inner frame where it overlaps the outer frame — typically 6 to 12 inches above the handle. Drill a downward-angled hole through the inner frame and partway into the outer frame at this point, at approximately 30 to 45 degrees downward. Insert a hardened steel bolt or pin of appropriate diameter. The pin prevents the inner frame from sliding past the outer frame when inserted.
The most important detail is the angle — a pin drilled straight across rather than downward will slide out when the door is lifted. A downward angle keeps the pin in position under gravity. Drill slowly on aluminum and vinyl frames to avoid cracking — these materials cut cleanly with a sharp bit at low speed, not high torque.
Job 5 — Keyed Deadbolt With New Frame Holes
A keyed deadbolt that replaces the existing latch in the same cutout is DIY-accessible. A deadbolt that requires a new hole drilled through the door frame at a different location is where professional involvement becomes worthwhile for most homeowners. The positioning requirements are precise — the bolt must align with a strike plate at exactly the right height, and the strike plate cutout in the frame must be accurate for the bolt to engage cleanly.
Getting the position wrong on the first attempt requires filling the incorrect hole before redrilling — a manageable fix on a standard frame but significantly more complicated on an impact-rated door where the frame integrity matters for the door's wind certification. For this job type, the professional's value is primarily in getting the position right on the first attempt rather than in the technical difficulty of the drilling itself.
Job 6 — Impact Door Lock Work
Impact-rated doors — now the dominant door type in Naples and throughout Collier County following the post-2004 hurricane code updates — are certified as complete systems. Any modification that creates new frame penetrations must be properly sealed to preserve the door's air and water infiltration rating and, more importantly, its wind load certification.
Replacing a latch assembly in the existing factory cutout on an impact door carries no certification risk — you're using the same holes the manufacturer provided. Adding secondary locks that surface-mount to the frame (Charlie bar, pin lock) present minimal risk when correct fasteners are used. Drilling new through-frame holes for a deadbolt installation on an impact door requires the correct sealant compound and awareness of the frame's structural geometry, which varies by manufacturer. This is the specific scenario where a technician familiar with PGT, CGI, and other South Florida impact door brands is the right call over a general DIY approach.
Rather Skip the DIY? Same-Day Service Available.
Lock installation and replacement across Naples, Marco Island, Bonita Springs, and all of Southwest and South Florida. Free estimates, flat-rate pricing, warranty on every job.
Tools You Actually Need
The tool requirements for sliding door lock work are minimal. Here's what covers every DIY lock job type on this list.
- Phillips screwdriver — handles the primary latch assembly in all job types
- Flathead screwdriver — for prying off plastic covers and accessing hidden screws
- Cordless drill — needed for Charlie bar, foot bolt, and pin lock installations
- HSS drill bits (3/16" and 1/4") — for aluminum and vinyl frame work
- Masonry bit — only needed if the threshold is concrete (foot bolt installations)
- Tape measure — for marking bracket positions and confirming screw spacing
- Rubber mallet — for freeing a corroded assembly without damaging the frame
- Needle-nose pliers — for retrieving broken screw fragments if needed
- Exterior-grade sealant — for any new frame penetration on an impact door
- Penetrating lubricant (silicone spray, not WD-40) — for a stiff assembly that won't slide out
Before starting any lock replacement, photograph the existing assembly in place with the interior cover removed — showing the cam mechanism, the screw hole positions, and the latch bolt. These photos are invaluable if the replacement part turns out to be wrong and you need to describe what you have to a parts supplier. They're also useful if the job needs to be handed off to a professional mid-way through.
The Real Risks of a DIY Lock Replacement
Most DIY lock jobs that go wrong fall into one of four categories. Understanding them in advance eliminates the most common failure points.
The most common DIY failure. The replacement looks correct in the packaging photo but the screw hole spacing is different by 5mm, or the cam depth is slightly off. The fix is sourcing the correct part — which requires the original measurements or manufacturer identification before purchasing, not after the old assembly is already out.
Overtightening screws on aluminum or vinyl frames strips the threads in the frame wall, leaving no way to secure the next fastener in the same location. Use correct fastener sizes, hand-tighten first across all holes, then snug down — never maximum torque on a sliding door frame.
The new assembly is installed correctly but the latch misses the strike plate. This is almost always a door height issue — the rollers have worn and the door has dropped, putting the latch hook below the strike plate opening. The lock isn't the problem; the rollers need adjustment or replacement. Adjusting the roller height screws (access holes at the door panel bottom) raises the door and restores alignment.
Drilling new holes in an impact door frame without proper sealing can affect the door's wind load certification. This risk only applies to new frame penetrations — not to latch swaps in existing cutouts or surface-mounted secondary locks. If your Naples home has impact doors and the job requires new holes, professional installation is the correct call.
Never use a standard door lock or deadbolt designed for a swinging door on a sliding door frame. The operating geometry is fundamentally different — a swinging door bolt engages a jamb perpendicular to the door plane, while a sliding door bolt must engage parallel to the door's movement direction. Forcing a swinging door lock onto a sliding door frame can damage the frame and leaves the door unsecured regardless of how locked it appears.
What to Do When the DIY Attempt Doesn't Work
The two most common scenarios where a DIY lock job needs professional intervention are a wrong replacement part that's already been partially installed, and a stripped frame thread that won't hold a new fastener. Neither is a catastrophe — both are recoverable — but they're easier to resolve before the situation compounds.
If the replacement doesn't fit: stop installing it. Don't force it. Remove the pieces, reinstall the old assembly as a temporary closure (even a corroded latch provides more security than an open frame), and source the correct replacement before attempting again. A door with a corroded lock is less dangerous than a door with a partially installed wrong lock that doesn't engage at all.
If you've stripped a frame thread: a thread repair insert (helicoil) restores the thread in aluminum frames and is a straightforward repair for a professional. Don't try to drive a larger screw into the stripped hole — it weakens the surrounding material and creates a worse problem than the original stripped thread.
If the lock is installed but the latch doesn't align: check the roller height first. Adjusting the roller height screws clockwise raises the door and may bring the latch hook into alignment with the strike plate. If roller adjustment doesn't solve it, the door may need professional assessment to determine whether the rollers or the track are the underlying issue.
DIY Lock Work in Naples — Specific Considerations
Naples and Collier County homeowners face two specific variables that affect DIY lock work more than most Florida markets: the high prevalence of impact-rated doors and the Gulf Coast salt air environment that makes lock hardware sourcing more critical.
The impact door consideration is covered above — latch swaps in existing cutouts are DIY-safe on impact doors; new frame holes require professional attention for certification preservation. The parts sourcing challenge is more nuanced. The dominant impact door brands in Naples construction — PGT, CGI, and Andersen — use proprietary handle and latch assemblies that aren't interchangeable with standard residential hardware. A homeowner who purchases a standard replacement latch from a hardware store and attempts to install it in a PGT door will find it doesn't fit, because the PGT cutout dimensions and cam geometry are specific to PGT hardware.
For Naples DIY lock work, the correct starting point is identifying the door brand from the frame stamp and contacting a sliding door parts supplier who stocks OEM or compatible impact door hardware. The time spent on this step upfront is always less than the time spent returning an incompatible part and sourcing the correct one after the old assembly is already out. If the brand is unidentifiable or the correct part is unavailable, Naples sliding door lock service is available same-day — we carry the most common impact door lock assemblies on the vehicle and can confirm the correct part on-site. Schedule a free estimate to get started.
DIY Didn't Work Out? We'll Fix It Same Day.
Serving Naples, Marco Island, Bonita Springs, Fort Lauderdale, Pompano Beach, and all of South Florida. Free estimates, warranty on every job, flat-rate pricing.
Frequently Asked Questions
Yes for most jobs. A primary latch swap requires only a screwdriver and the correct part — a 20-minute job for any homeowner comfortable with basic tools. Secondary locks like Charlie bars require a drill. The main risk is sourcing an incorrect replacement — confirm fitment before purchasing.
Basic handiness — comfortable with a screwdriver — is all that's needed for a primary latch swap. Adding secondary locks requires a drill. Keyed deadbolt installations with new frame holes and any lock work on impact-rated doors benefit from more experience or professional involvement.
Sourcing the correct replacement part is consistently the hardest part. Visually similar assemblies with different screw spacing or cam dimensions won't fit correctly. Confirm measurements or manufacturer specifications before purchasing — this step prevents the most common DIY failure point.
The most common outcome is a latch that doesn't align with the strike plate — the door appears locked but isn't actually secure. A wrong-sized assembly may also leave gaps in the frame cutout. The fix is sourcing the correct part, which is why fitment confirmation before starting is the most important preparation step.
Physical damage is uncommon with basic care. The most realistic risk is stripping frame threads by overtightening — especially on aluminum frames. On impact-rated doors, drilling new holes without proper sealing can affect the wind certification. Using correct fastener sizes and avoiding excess torque prevents the main damage scenarios.
A primary latch and handle swap takes 20 to 30 minutes with the correct part. A Charlie bar bracket takes 15 to 20 minutes. A foot bolt takes 30 to 45 minutes including threshold drilling. First-time installations typically run longer — budget extra time for measuring, test-fitting, and minor adjustments.